Script TOP in TouchDesigner – Canny Edge Detector

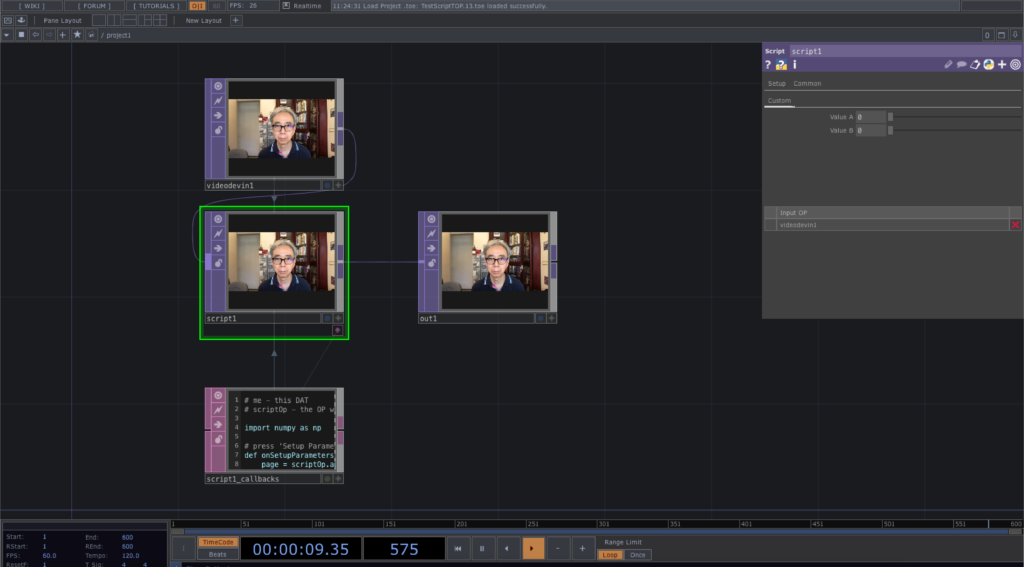
After the first introduction of the Script TOP, the coming example will implement the Canny Edge Detector with OpenCV in TouchDesigner as a demonstration. TouchDesigner already includes its own Edge TOP for edge detection and visualisation.

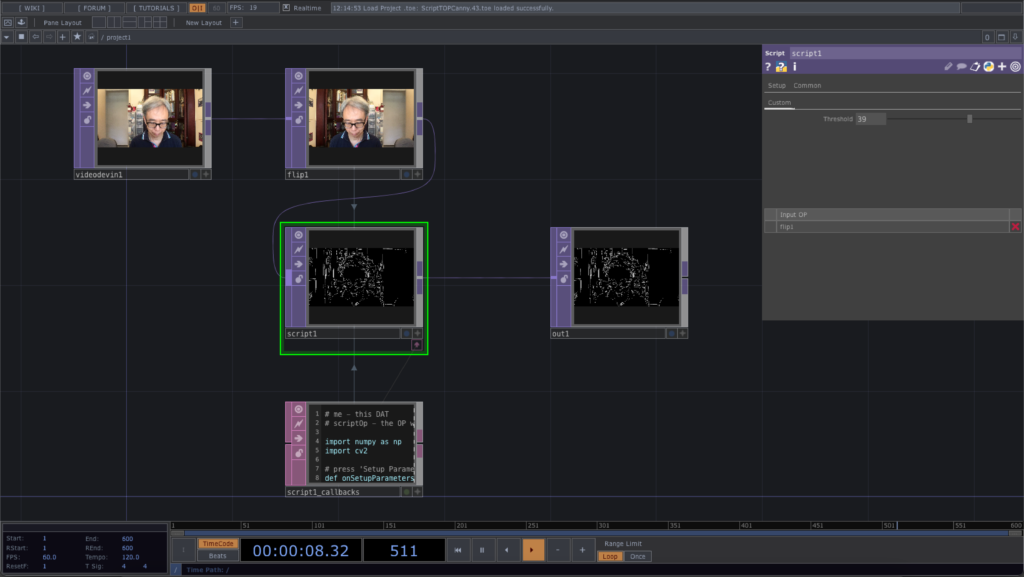
We also implement a slider parameter Threshold in the Script TOP to control the variation of edge detection.

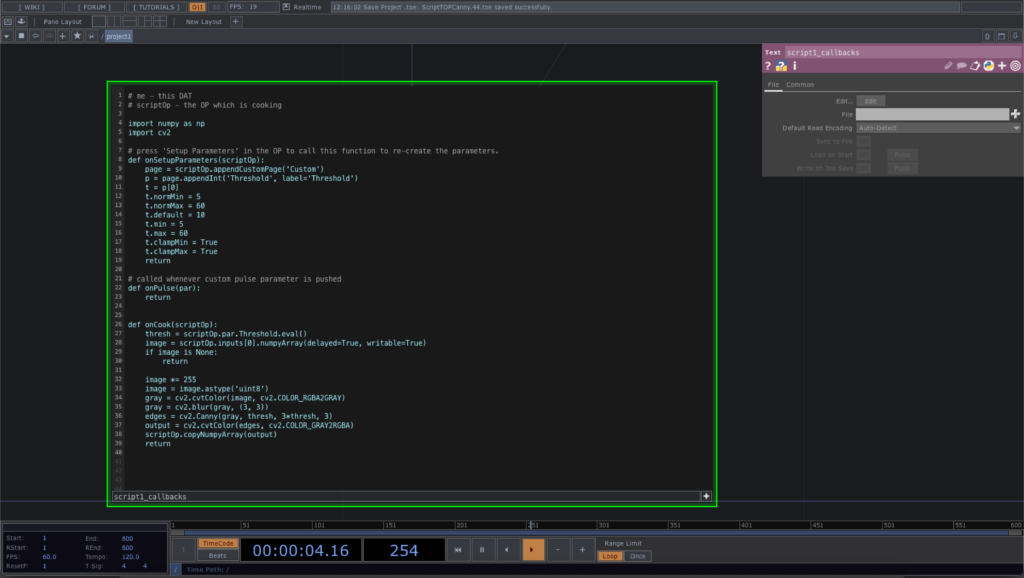
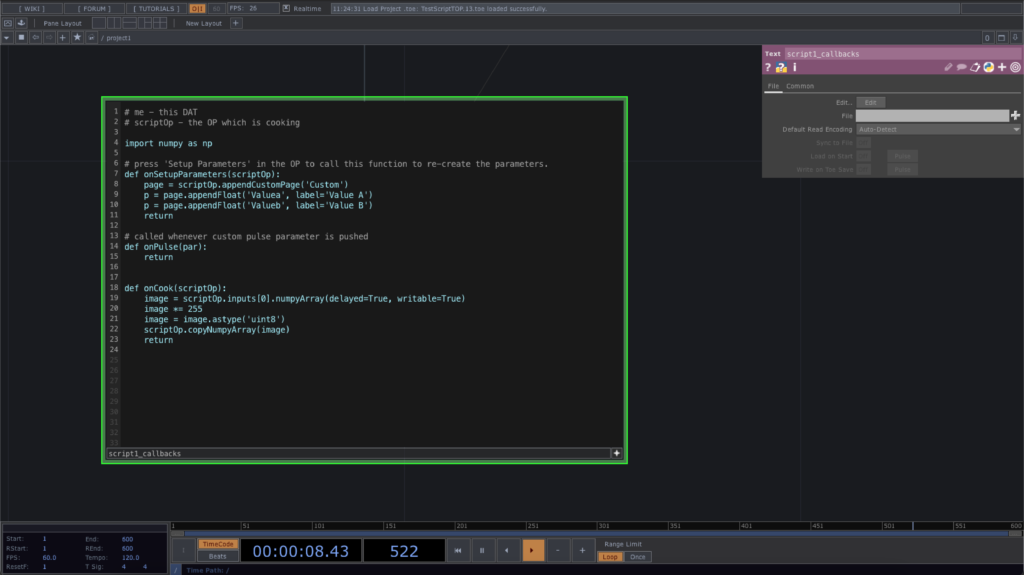
Here is the source code of the Script TOP. Note that we have made a lot of changes in the default function, onSetupParameters to include a custom parameter, Threshold as an integer slider. It will generate a value between 5 and 60, to be used in the onCook function as a threshold value for the Canny edge detection.

# me - this DAT
# scriptOp - the OP which is cooking
import numpy as np
import cv2
# press 'Setup Parameters' in the OP to call this function to re-create the parameters.
def onSetupParameters(scriptOp):
    page = scriptOp.appendCustomPage('Custom')
    p = page.appendInt('Threshold', label='Threshold')
    t = p[0]
    t.normMin = 5
    t.normMax = 60
    t.default = 10
    t.min = 5
    t.max = 60
    t.clampMin = True
    t.clampMax = True
    return

# called whenever custom pulse parameter is pushed
def onPulse(par):
    return

def onCook(scriptOp):
    thresh = scriptOp.par.Threshold.eval()
    image = scriptOp.inputs[0].numpyArray(delayed=True, writable=True)
    if image is None:
        return

    image *= 255
    image = image.astype('uint8')
    gray = cv2.cvtColor(image, cv2.COLOR_RGBA2GRAY)
    gray = cv2.blur(gray, (3, 3))
    edges = cv2.Canny(gray, thresh, 3*thresh, 3)
    output = cv2.cvtColor(edges, cv2.COLOR_GRAY2RGBA)
    scriptOp.copyNumpyArray(output)
    return

The first line in the onCook function is to retrieve the integer value from the parameter, Threshold. We also exit the function when there is not valid video image coming in. For the edge detection, we convert the RGBA image into grayscale and then perform a blur function. the cv2.Canny function returns the detected edges in a grayscale image, edges. Finally, we convert the edges into a regular RGBA image, output, for subsequent output as before.

The final TouchDesign project is available in this GitHub repository.

Script TOP in TouchDesigner

Before we start using MediaPipe in TouchDesigner, we need to be familiar with the use of the Script TOP and Script CHOP first. For the Script TOP, we can generate the image (TOP) directly from Python code. In the following example, we are going to pass through the incoming image from Video Device In TOP to the output window with minimal manipulation in Python inside the Script TOP. The OpenCV in TouchDesigner reference page in the Derivative website is a good starting point.

We create a very simple TouchDesigner project, connecting the Video Device In to the Script TOP and then to the Output window. Note that the Script TOP comes with an associated Script Text DAT. We are going to modify the default Python code inside this text area with the name script1_callbacks.

We can directly edit the Python code inside the Text DAT by turning on the Viewer Active button in the bottom right corner. Alternately, we can click the Edit button in the parameter window to open the code in your default code editor, XCode in my case.

# me - this DAT
# scriptOp - the OP which is cooking
import numpy as np
# press 'Setup Parameters' in the OP to call this function to re-create the parameters.
def onSetupParameters(scriptOp):
     page = scriptOp.appendCustomPage('Custom')
     p = page.appendFloat('Valuea', label='Value A')
     p = page.appendFloat('Valueb', label='Value B')
     return

# called whenever custom pulse parameter is pushed
def onPulse(par):
    return

def onCook(scriptOp):
    image = scriptOp.inputs[0].numpyArray(delayed=True, writable=True)
    image *= 255
    image = image.astype('uint8')
    scriptOp.copyNumpyArray(image)
    return

The code has 3 functions, onSetupParameters, onPulse and onCook. We only use the onCook for this example. Cooking is the update of a node when necessary for very frame. The detailed explanation can be found from the TouchDesigner Cook page. Essentially, we can consider it as frame by frame update of the node we are working on. The first function, onSetupParameters is triggered by a button in the parameter window under the Setup tab. We can consider it the initialisation of the process. The second function, onPulse, will not be used here since we do not have any Pulse button or Pulse parameters defined here. We are going to walk through the simple onCook function.

In the first line, scriptOp (the current node), will retrieve its first input, 0, (the Video Device In) and convert the current video frame in a NumPy array. The format of the array is Height x Width x RGBA. Each colour pixel is a 32 bit floating point number within the range of 0 to 1. In our case, the video size is 1280 x 720. The 2 optional parameters, delayed=True and writable=True will be explained in the TOP class reference. In this example, we aim to convert the 32 bit floating point colour format to 8 bit unsigned integer for output.

In the second line, each colour pixel will multiply 255 by itself to convert the colour range between 0 to 255.

The third line, the NumPy array is modified into 8 bit unsigned integer format, uint8.

The last line will copy back the NumPy array, with the function copyNumpyArray, into the Script TOP texture for output.

The final TouchDesigner project can be downloaded from this GitHub repository.

MediaPipe in TouchDesigner 1

It is the part 1 of the tutorials introducing the use of the Google MediaPipe machine learning library in TouchDesigner. It will assume basic knowledge of TouchDesigner and fundamental coding skill in Python. The platform I am working on is a MacBook Pro running the OSX 11. TouchDesigner has its integrated Python programming environment. At the moment of writing, the Python version is 3.7. It also comes with a number of pre-installed external libraries, such as NumPy and OpenCV.

The first installation will be the Python programming language environment. I would recommend installing the official 3.7 version from the Python download website. Expand the dmg file and run the installer to install the proper Python version to the computer.

After we have the Python installed, the next step will be external libraries we would like to use in the Python environment. The target one is MediaPipe. We are going to use the pip command from the OSX Terminal. For general usage of the OSX Terminal, we can refer to the Terminal User Guide from Apple. For those who may have multiple Python versions installed, we can use the specific command pip3.7 to install the external libraries to make sure they are compatible with the TouchDesigner. For a brand new Python environment, the libraries it come with are:

  • pip
  • setuptools
  • wheel
pip list command

Pip is one of the package management system we can use in the Python environment. To install extra library such as the MediaPipe, we can type the following from the Terminal.

pip3.7 install --upgrade --user mediapipe
Install MediaPipe with pip

The following screenshot listed all the libraries we have after the installation.

The list of libraries after installing MediaPipe

After we ready the Python and the MediaPipe library, we can go back to TouchDesigner to enable it to link to the external libraries that we have installed outside it.

From the TouchDesigner pull down menu, choose Dialogs – Textport and DATs.

Textport and DATs

Inside the Textport, we can try to import OpenCV and list its current version.

OpenCV

The next step is to customise the external libraries location from the Preferences menu. From the pull down menu, choose TouchDesigner – Preferences – General.

Preferences

Click the folder icon from the description, Python 64-bit Module Path. It will open up the file location dialog panel. Choose the home directory of your current user account. Since the Python libraries are installed inside the hidden Library folder, we need to type CMD SHIFT <period> to display all the hidden folders. Press the CMD, SHIFT and period “.” keys together. Choose the correct folder location as

Library/Python/3.7/lib/python/site-packages

and click Open.

External modules folder

Click the Save button for the Preferences panel.

Save the Preferences

After we save the preferences, we can verify the installation of MediaPipe from the Textport panel by importing the mediapipe module and list out some of its components.

import mediapipe as mp
print(dir(mp.solutions))
Verify the MediaPipe installation

We are now ready to play with the MediaPipe library in TouchDesigner. The first one will be the face detection facility in a Script TOP.

Capture midi messages in Processing during playback

The 2nd midi in Processing example will use the Receiver interface to capture all the midi messages during the playback of a midi file. The program uses the custom GetMidi class to implement the Receiver interface. During the playback, it will display the NOTE_ON message with information of channel, octave and note.

The source code of the example is also in the Magicandlove GitHub repository.

Sample Processing screen during midi playback

Using midi in Processing for playback

This is my first use of midi in Processing. I do not use the MidiBus library for Processing. Instead, I try to use the standard midi package in Java. The SE8 standard Java package also contains the javadoc documentation.

Screenshot of the Processing sketch

The Processing source code and sample midi files are in the Magicandlove GitHub repository. The midi example files are downloaded from the midiworld website.

The code basically needs a Synthesizer class to render midi instruments into audio and a Sequencer class to playback the midi sequence.

Synthesizer synth = MidiSystem.getSynthesizer();
Sequencer player = MidiSystem.getSequencer();
synth.open();
player.open();

All the midi music files are in the data folder of the Processing sketch. To playback each piece of midi music, we need to convert each into a Java File object and use the following code to playback it. The variable f is a File object instance containing the midi file in the data folder.

Sequence music = MidiSystem.getSequence(f);
player.setSequence(music);
player.start();