In the former post, I have tested using the jCodec 0.1.5 and 0.2.0 to save the Processing screen into an MP4 file. The latest version of jCodec 0.2.3 has, however, changed its functions for the AWT based applications. Here is the new code for Processing to use jCodec 0.2.3 to save any BufferedImage to an external MP4 file.
To use the code, you need to download from the jCodec website the following two jar files and put them into the code folder of your Processing sketch.
jcodec-0.2.3.jar
jcodec-javase-0.2.3.jar
The following code will write a frame of your Processing screen into the MP4 file for every mouse pressed action.
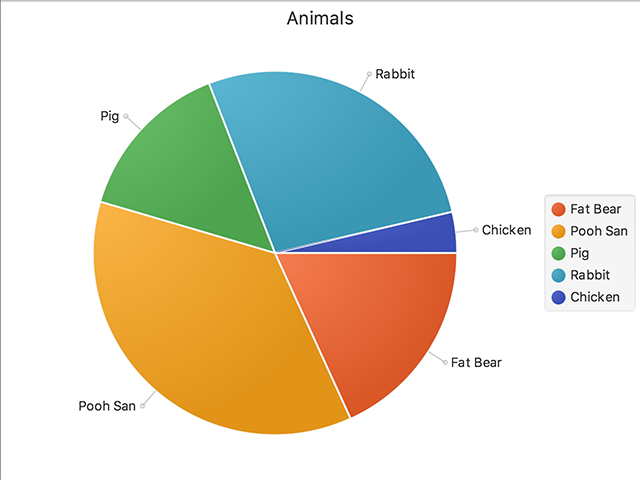
Here is the first test of using Charts from JavaFX in Processing. In the recent version of Processing, we are able to use FX2D renderer. The following is a simple pie chart example.
importjavafx.scene.canvas.Canvas;importjavafx.scene.Scene;//import javafx.stage.Stage;importjavafx.scene.layout.StackPane;importjavafx.collections.ObservableList;importjavafx.collections.FXCollections;importjavafx.scene.chart.*;importjavafx.geometry.Side;void setup(){
size(640, 480, FX2D);
background(255);
noLoop();}void draw(){
pieChart();}void pieChart(){Canvas canvas =(Canvas)this.getSurface().getNative();
Scene scene = canvas.getScene();// Stage st = (Stage) s.getWindow();
StackPane pane =(StackPane) scene.getRoot();
ObservableList<PieChart.Data> pieChartData =
FXCollections.observableArrayList(new PieChart.Data("Fat Bear", 10),
new PieChart.Data("Pooh San", 20),
new PieChart.Data("Pig", 8),
new PieChart.Data("Rabbit", 15),
new PieChart.Data("Chicken", 2));
PieChart chart =new PieChart(pieChartData);
chart.setTitle("Animals");
chart.setLegendSide(Side.RIGHT);
pane.getChildren().add(chart);}
import javafx.scene.canvas.Canvas;
import javafx.scene.Scene;
//import javafx.stage.Stage;
import javafx.scene.layout.StackPane;
import javafx.collections.ObservableList;
import javafx.collections.FXCollections;
import javafx.scene.chart.*;
import javafx.geometry.Side;

void setup() {
  size(640, 480, FX2D);
  background(255);
  noLoop();
}

void draw() {
  pieChart();
}

void pieChart() {
  Canvas canvas = (Canvas) this.getSurface().getNative();
  Scene scene = canvas.getScene();
  //  Stage st = (Stage) s.getWindow();
  StackPane pane = (StackPane) scene.getRoot();

  ObservableList<PieChart.Data> pieChartData =
    FXCollections.observableArrayList(
    new PieChart.Data("Fat Bear", 10),
    new PieChart.Data("Pooh San", 20),
    new PieChart.Data("Pig", 8),
    new PieChart.Data("Rabbit", 15),
    new PieChart.Data("Chicken", 2));
  PieChart chart = new PieChart(pieChartData);
  chart.setTitle("Animals");
  chart.setLegendSide(Side.RIGHT);

  pane.getChildren().add(chart);
}
Instead of using the Processing millis() function or the Java Timer class, we can also make use of the relatively new Instant and Duration classes in Java 8. Here is one simple example for demonstration.
The program uses 2 Instant variables: start, end. It computes the time duration between them using the Duration.between() function.
The new release of OpenCV 3.3 is out now. I again prepare the Java build for the CVImage Processing library use. It also includes the optflow extra module for motion history applications. Here is the list of the 3 OpenCV releases.
The book Pro Processing for Images and Computer Vision with OpenCV will be released soon. It will include the detailed build instructions in multiple platforms.
The Java binding for the Google Deep Learning library, TensorFlow is now available. The binary library files for version 1.1.0-rc1 are also available for download here. Below is the code for the Hello World program included in the distribution that I modified for Processing.
importorg.tensorflow.Graph;importorg.tensorflow.Session;importorg.tensorflow.Tensor;importorg.tensorflow.TensorFlow;
Graph g1;
Output o1;
Output o2;
Output o3;
PFont font;String res;void setup(){
size(640, 480);
noLoop();}void draw(){
background(0);
Graph g =new Graph();String value ="Hello from "+ TensorFlow.version();
Tensor t =null;try{
t = Tensor.create(value.getBytes("UTF-8"));}catch(Exception e){
println(e.getMessage());}
g.opBuilder("Const", "MyConst")
.setAttr("dtype", t.dataType())
.setAttr("value", t)
.build();
Session s =new Session(g);
Tensor output =null;try{
output = s.runner()
.fetch("MyConst")
.run()
.get(0);
println(newString(output.bytesValue(), "UTF-8"));}catch(Exception e){
println(e.getMessage());}}
In preparing for the forthcoming book in Processing and OpenCV, I have tried to build the Java binding in OpenCV 3.2. It worked easily for the basic components. Nevertheless, when I included the contribution module – optflow, it failed. After a number of attempts in various platforms, I found it was due to the gen_java.py script in folder opencv-3.2.0/modules/java/generator. I tried to add back the import details for the class DenseOpticalFlow. It worked again. Here is what I patch in the gen_java.py script.
For those who do not want to build it yourselves, you can download a pre-built version of the OpenCV 3.2 Java library. You can use it with Processing immediately. I have tested it with the current Processing at 3.3. It contains the following files for various platforms in 64 bit:
This sketch demonstrates the use of the Robot class in Java to perform screen capture in Processing. It will create Jodi like effect with feedback in computer screen. Have fun with it.
Here are the codes. It makes use of the Robot class.