OpenCV 4.0.0 is now available in the official OpenCV.org website. I have compiled and packaged the CVImage library from my book together with the Java build of the new OpenCV library.
You can download the CVImage library here.
OpenCV 4.0.0 is now available in the official OpenCV.org website. I have compiled and packaged the CVImage library from my book together with the Java build of the new OpenCV library.
You can download the CVImage library here.
The second testing is also based on the Java wrapper of the Intel Realsense SDK by Edwin Jakobs. The version is the display of the 16 bit depth image from Processing.

The source code again can be available from the GitHub repository of this post.
The testing is based on the Java wrapper of the Intel Realsense SDK, version 2 found in the following GitHub repository.
https://github.com/edwinRNDR/librealsense/tree/master/wrappers/java.
It only provides the pre-built binary for Windows version. I used it to test with my Intel Realsense D415 camera. The image below is the screenshot of the camera view.

The source code can be found in the GitHub repository of this post.
A new version of the Movement in Space project will be exhibition end of this year as an installation piece. Here are some testing videos.
The work is rewritten from the original web version to a Processing version. The animation is built with 3 parametric harmonic formulae. The outputs from one animation can be used as inputs for another formula, in order to simulate the artificial neural network.
The example is the Processing implementation of the OpenCV sample, fast_neural_style.py to work with live style transfer using existing pre-trained Torch models.


The complete source code is in my GitHub repository of this website at ml20180827a.
Referring back to the post on face landmark detection, the command to retrieve face landmark information is
fm.fit(im.getBGR(), faces, shapes); |
where im.getBGR() is the Mat variable of the input image; faces is the MatOfRect variable (a number of Rect) obtained from the face detection; shapes is the ArrayList<MatOfPoint2f> variable returning the face landmark details for each face detected.
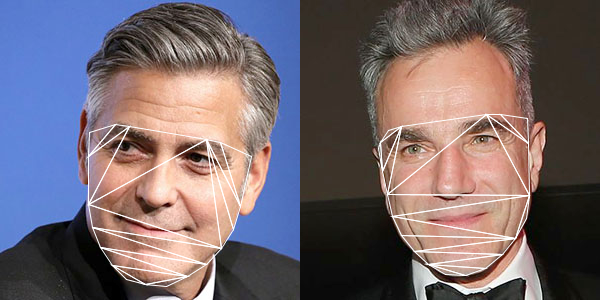
Each face is a MatOfPoint2f value. We can convert it to an array of Point. The array has length 68. Each point in the array corresponds to a face landmark feature point in the face as shown in the below image.

To enhance the last post in face swap, we can make use of the cloning features of the Photo module in OpenCV. The command we use is the seamlessClone() function.
Photo.seamlessClone(warp, im2, mask, centre, output, Photo.NORMAL_CLONE); |
where warp is the accumulation of all warped triangles; im2 is the original target image; mask is the masked image of the convex hull of the face contour; centre is a Point variable of the centre of the target image; output will be the blended final image.

Complete source code is now in the GitHub repository, ml20180820b.
After the previous 4 exercises, we can start to work on with the OpenCV face swap example in Processing. With the two images, we first compute the face landmark for each of them. We then prepare the Delaunay triangulation for the 2nd image. Based on the triangles in the 2nd image, we find corresponding vertices in the 1st image. For each triangle pair, we perform the warp affine transform from the 1st image to the 2nd image. It will create the face swap effect.

Note the skin tone discrepancy in the 3rd image for the face swap.
Full source code is now available at the GitHub repository ml20180820a.
The 4th exercise is a demonstration of the planar subdivision function in OpenCV to retrieve the Delaunay triangulation of the face convex hull outline that we obtain from the last post. The program will use the Subdiv2D class from the Imgproc module in OpenCV.
Subdiv2D subdiv = new Subdiv2D(r); |
where r is am OpenCV Rect object instance defining the size of the region. It is usually the size of the image we are working on. For every point on the convex hull, we add it to the subdiv object by,
subdiv.insert(pt); |
where pt is an OpenCV Point object instance. To obtain the Delaunay triangles, we use the following codes,
MatOfFloat6 triangleList = new MatOfFloat6(); subdiv.getTriangleList(triangleList); float [] triangleArray = triangleList.toArray(); |
The function getTriangleList() will compute the Delaunay triangulation based on all the points inserted. It will return the result in the variable, triangleList. This variable is an instance of MatOfFloat6, and which is a collection of 6 numbers. The first pair of numbers are the x and y position of the first vertex of the triangle. The second pair of numbers are for the second vertex. The third pair of numbers are for the third vertex of the triangle. Based on this, we can draw each triangle in the Delaunay triangulation process, as shown in the image below.
Complete source code is now available in my GitHub repository at ml20180819b.